And here I am back to give a fabulous (HAHA!) tutorial on how I made my "homemade" flowers!
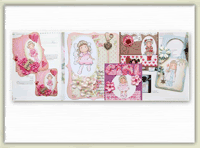
First here is a close up of my flowers:
 Just click on the pick for a real good close up.
Now for the deets!
Start off with a circular shaped piece of DP around 3-5" big (depends on how big you want to make your flowers)
 I like to use DP cause it is nice and thick and I use one that is patterned on both sides preferably with a lighter and darker side. I find it creates depth.
 Now run it through a paper crimper to break it down a bit and soften the cardstock. Go in a few directions.
 Now take the circle and cut it into a spiral shape.
 Now curl it up starting from the outside and roll into the center.
 Place a large glue dot in the center of the very center.
 Use tweezers to press the tip of the section you began rolling up first. How tight you roll your flower is up to you and how the finished flower looks will depend on how tight it is. Tighter flowers look more like buds. How many "rings" there are will also change the look of the flower.
 Sponge the edges if you want.
 Now press and bend and crumple up the edges to make it look like curled petals. I just kinda use the palm of my hand to "cram" it down a bit.
 I use cheap clear glue, spread a few drops in the center of the flower and pour micro beads (could also use reg beads, pearls, etc.) into the center, pour off the excess and let it dry.
 I use a MS small rose leaf punch (would love a larger one if anyone knows where I can order one!) to punch out leaf shapes.
 I use an embossing stylus to create a vein down the center of the leaf so I can bend it easily. Bend the leaf towards the embossed side.
 Use a dark color, I used smokey plum by CTMH, to sponge the center and edges of the leaf. EWWWW! My nail looks like I have dirt under it but I promise you it is hair color! I should use gloves! Could be ink too! Never know with me, it is always something creative stuck to my hands!
 Now curl the leaf back so that it is bent in towards the sponged side and it creates a raised vein effect.
 And here is the finished flower! Here is another close up of some of the flowers on my Tilda card. As you can see, I curled the edges in on the orange flower and out on the Tilda flower which also changes the look.
 I hope you enjoyed the tutorial! I love making these roses and the possibilities are limited only by your imagination!
xo Pickles!
First here is a close up of my flowers:

Now for the deets!
Start off with a circular shaped piece of DP around 3-5" big (depends on how big you want to make your flowers)


xo Pickles!


4 comments:
Thanks for that Pickles! Will have a go. You did make me laugh though I just LOved 'cram' it's a good word LoL.
Chrissyxx
Fabby tutorial hun, thanks for sharing
hugs Mandy xx
FAB tutorial girl! lob it!
Wow... Great Job on the flowers and fantastic tutorial !
Thanks for joining our challenge at Paper Sundaes !
Post a Comment